Automation is always a good thing and Windows 7 (this will also be aplicable to windows 8 and 10) includes all the tools you need to make and copy the contents of a Windows 7 Setup ISO file (or a Windows 7 Setup DVD) to a bootable USB memory stick.
With all the new operating systems you will be able to install from usb so this will work for windows 7, windows 8, windows server 2008, windows server 2012 and windows server 2016.
Requirements
All you’ll need to make your own bootable iso:
- A Windows 7 based PC of some kind this will also work on Windows 8 and 10.
- A USB memory stick. This device will need to have enough storage to hold the contents of Windows 7 ISO, so you’re looking for a device with 4 GB of storage or more. (The smallest mainstream 32-bit version of Windows 7 still takes up more than 2 GB of space on disk, so 4 GB is the minimum.)
- 7-Zip,WinRAR or a similar utility that can extract the contents of an ISO file (I prefer and use 7-Zip).
Making The Bootable Memory Stick
Here’s how you do it.
-
Insert the USB key into your PC. (Note that this process will wipe anything on the USB stick.)
-
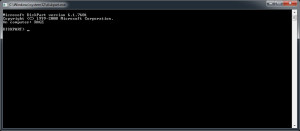
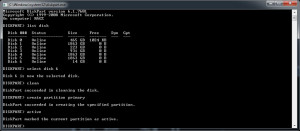
Open the Start Menu, type diskpart in Start Menu Search and then tap Enter. Click Yes on the User Account Control dialog that appears. A command line window will open with the diskpart command line utility running.
-
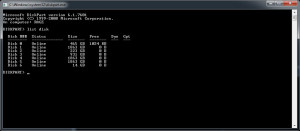
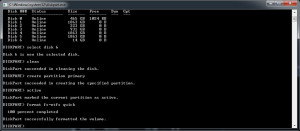
Type list disk and then tap Enter. You will see a listing of the various disks attached to your PC, including the USB key.
-
You will need to find the USB key in the list. In my case, the USB key is identified as Disk 6 (14 GB), but this can and probably will be different on your own PC.
-
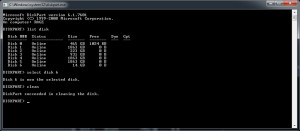
Type select disk # where “#” is the number of disk representing the USB key (In my case, 6.) and then tap Enter. Disk part will report, “Disk 6 is now the selected disk.” (Or whatever number is correct for you.)

-
Type clean and then tap Enter. Diskpart will run for a second and then report, “Diskpart succeeded in cleaning the disk.”
-
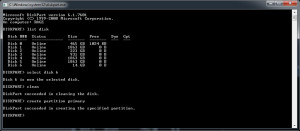
Type create partition primary and tap Enter. Diskpart will run for a second and then report, “Diskpart succeeded in creating the specified partition.”
-
Type active and then tap Enter. Diskpart will run for (less than) a second and then report, “Diskpart marked the current partition as active.”
-
Type format fs=fat32 quick (or, if the USB key is over 4GB, format fs=ntfs quick) and then tap Enter. Diskpart will provide a percentage progress indicator while it formats the device. Eventually, diskpart will report that the process is “100 percent completed” and note that “Diskpart successfully formatted the volume.”
-
Type assign and then tap Enter. This assigns the next available drive letter to the USB key. Diskpart will report, “Diskpart successfully assigned the drive letter or mount point,” and an AutoPlay dialog will most likely appear. Dismiss the dialog.

-
Type exit and tap Enter to close diskpart (and the command line window).
-
Now you need to extract the contents of the Setup ISO to your hard drive. If you’re using a Windows 7 Setup DVD instead of an ISO file, of course, you can skip this step. There are various utilities that can extract the contents of an ISO file, but I happen to like and use 7zip, To extract the ISO with 7zip, right-click it and choose Extract Files (an option that 7zip adds to the Windows 7 context menu.)
Ensure that the path is what you want in 7zip (I usually just create a folder on the desktop, something like “Win7”) and then click OK. 7zip will extract the contents of the ISO file to the selected folder. -
When the extraction is complete, you’ll want to open two Explorer windows: One for the folder to which you extracted the Windows 7 Setup files (the source) and one for the USB key (the destination). Select all of the files in the source folder and drag and drop them (copy them) to the USB key.
The file copy phase could take a while. -
When that’s done, you’re ready to install. You should now be able to boot the appropriate PC using the USB key and install Windows 7. Note, however, that most PCs will require you to interrupt the normal boot process and manually select the USB key as the boot disk. How you do this varies from PC to PC, on some PCs you will need to hit F2,F8, F10, F11, F12, or some other key. Consult your PC’s documentation for the details.
However you do it, once the PC is booting from the USB key, Setup will work just like it does via a normal Setup DVD, if you work in a office where you install windows on a regular basis then having the USB stick with the installer makes life easy, I often add the drives that are required once an install has completed for raid software sound card video card etc, which means you spend less time messing around with lots of CDs.
Hope you find this helpful.